
写在开头
这是Core Data知识的梳理,以APPLE 文档为主线
Core Data是什么?
Core Data is a framework that you use to manage the model layer objects in your application. It provides generalized and automated solutions to common tasks associated with object life cycle and object graph management, including persistence.
Core Data Stack
The Core Data stack is a collection of framework objects that are accessed as part of the initialization of Core Data and that mediate between the objects in your application and external data stores.
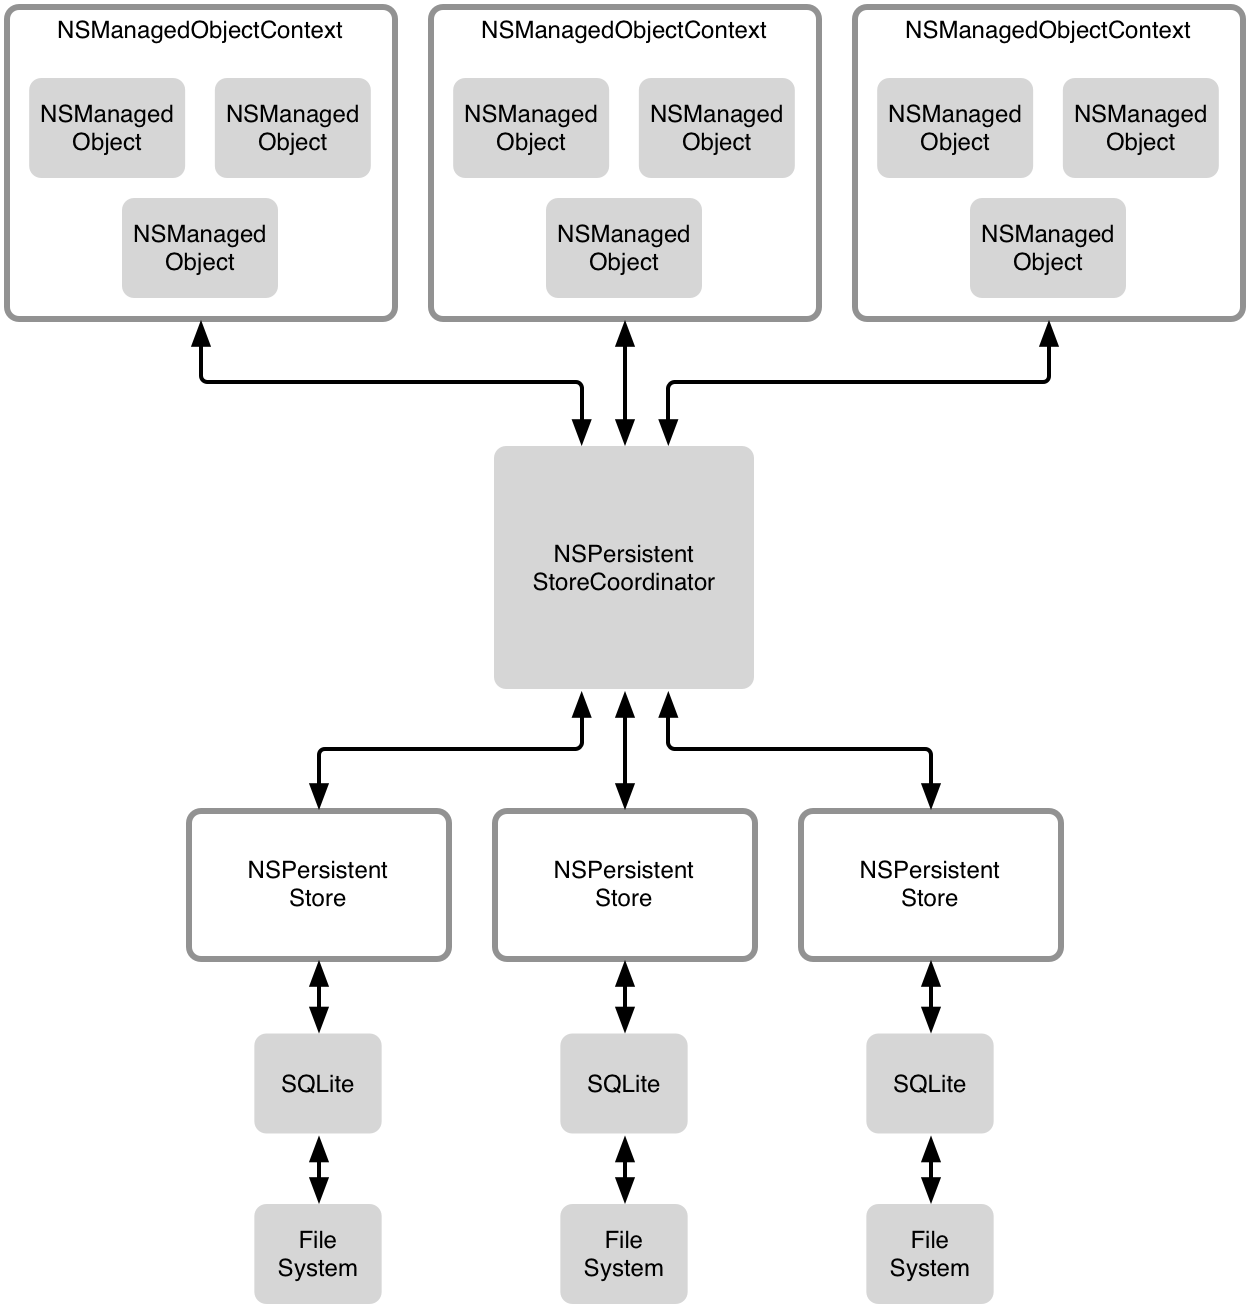
The stack consists of three primary objects: the managed object context (NSManagedObjectContext), the persistent store coordinator (NSPersistentStoreCoordinator), and the managed object model (NSManagedObjectModel).
-
NSManagedObjectModel
It describes the schema that you use in the app. If you have a database background, think of this as the database schema. However, the schema is represented by a collection of objects (also known as entities). In Xcode, the Managed Object Model is defined in a file with the extension .xcdatamodeld. You can use the visual editor to define the entities and their attributes, as well as, relationships. -
NSPersistentStoreCoordinator
SQLite is the default persistent store in iOS. However, Core Data allows developers to setup multiple stores containing different entities. The Persistent Store Coordinator is the party responsible to manage different persistent object stores and save the objects to the stores. -
NSManagedObjectContext
Think of it as a “scratch pad” containing objects that interacts with data in persistent store. Its job is to manage objects created and returned using Core Data. Among the components in the Core Data Stack, the Managed Object Context is the one you’ll work with for most of the time. In general, whenever you need to fetch and save objects in persistent store, the context is the first component you’ll talk to.
The below illustration can probably give you a better idea about the Core Data Stack:
the simple:

the complex:
深入
Creating and Saving Managed Objects
Creating Managed Objects
An NSManagedObject instance implements the basic behavior required of a Core Data model object. The NSManagedObject instance requires two elements: an entity description (an NSEntityDescription instance) and a managed object context (an NSManagedObjectContext instance).
As shown in this example, the NSEntityDescription class has a class method that accepts a string for the name of the entity and a reference to the NSManagedObjectContext that the NSManagedObject instance will be associated with.
Person *person = [NSEntityDescription insertNewObjectForEntityForName:NSStringFromClass([self class]) inManagedObjectContext:moc];
Creating NSManagedObject Subclasses
@interface Person : NSManagedObject

@property (nonatomic, strong) NSString *name;
@property (nonatomic, strong) NSString *desc;
@property (nonatomic, strong) NSString *uniqueID;

@end

@implementation Person

@dynamic name;
@dynamic desc;
@dynamic uniqueID;

@end
The @dynamic tag informs the compiler that the variable will be resolved at runtime.
Saving NSManagedObject Instances
The creation of NSManagedObject instances does not guarantee their persistence. Once you create an NSManagedObject instance in your managed object context, you must explicitly save that context to persist those changes to your persistent store.
NSError *error = nil;
if (![moc save:&error]){
    NSLog(@"Error occurs===%@ %@", error, [error localizedDescription]);
}
The call to save on the NSManagedObjectContext accepts a reference to an NSError variable and always returns either a success or a fail. If the save fails, it is important to display the error condition so that it can be corrected.
Fetching Objects
Now that data is stored in the Core Data persistent store, you will use an NSFetchRequest to access that existing data. The fetching of objects from Core Data is one of the most powerful features of this framework.
Fetching NSManagedObject Instances
In this example you start by constructing an NSFetchRequest that describes the data you want returned. This example does not add any requirements to that data other than the type of entity being returned. You then call executeFetchRequest:error: on the NSManagedObjectContext and pass in the request along with a pointer to an error.
NSFetchRequest *fetchRequest = [[NSFetchRequest alloc] initWithEntityName:NSStringFromClass([self class])];
NSError *error;
NSArray *arr = [moc executeFetchRequest:fetchRequest error:&error];
if (!error) {
    resultArr = [arr mutableCopy];
}
The executeFetchRequest:error: method has two possible results. It will either return an NSArray object with zero or more objects, or it will return nil. If nil is returned, you have received an error from Core Data and need to respond to it. If the array exists, you receive possible results for the request even though the NSArray may be empty. An empty NSArray indicates that there were no records found.
######Filtering Results
The real flexibility in fetching objects comes in the complexity of the fetch request. To begin with, you can add an NSPredicate object to the fetch request to narrow the number of objects being returned.
NSString *name = @"huyujin";
[fetchRequest setPredicate:[NSPredicate predicateWithFormat:@"name = '%@' ", name]];
In addition to narrowing the objects being returned, you can configure how those objects are returned. For example, you can instruct Core Data to return NSDictionary instances instead of fully formed NSManagedObject instances.
Connecting the Model to Views
In iOS, you use NSFetchedResultsController to connect the model (Core Data) to the views (storyboards).
NSFetchedResultsController provides the interface between Core Data and UITableView objects. Because table views are the most common way to display data in iOS, UITableView handles nearly all high-volume data displays.
Creating a Fetched Results Controller
Typically, an NSFetchedResultsController instance will be initialized by an UITableViewController instance that is going to utilize it. This initialization can take place in the viewDidLoad or viewWillAppear methods, or at another logical point in the life cycle of the view controller. This example shows the initialization of the NSFetchedResultsController`.
- (void)exploreFetchedResultsController {

    NSFetchRequest *request = [NSFetchRequest fetchRequestWithEntityName:@"Person"];
    NSSortDescriptor *nameSort = [NSSortDescriptor sortDescriptorWithKey:@"name" ascending:YES];
    [request setSortDescriptors:@[nameSort]];

    //
    HYJCoreDataStorage *storage = [HYJCoreDataStorage sharedInstance];
    NSManagedObjectContext *moc = [storage managedObjectContext]; //Retrieve the main queue NSManagedObjectContext

    [self setFetchedResultsController:[[NSFetchedResultsController alloc] initWithFetchRequest:request managedObjectContext:moc sectionNameKeyPath:nil cacheName:nil]];
    [[self fetchedResultsController] setDelegate:self];

    NSError *error = nil;
    if (![[self fetchedResultsController] performFetch:&error]) {
        NSLog(@"Failed to initialize FetchedResultsController: %@\n%@", [error localizedDescription], [error userInfo]);
        abort();
    }

}
In the exploreFetchedResultsController method shown above that will live within the controlling UITableViewController instance, you first construct a fetch request (NSFetchRequest), which is at the heart of the NSFetchedResultsController. Note that the fetch request contains a sort descriptor (NSSortDescriptor). NSFetchedResultsController requires at least one sort descriptor to control the order of the data that is being presented.
Once the fetched results controller is initialized, you assign it a delegate. The delegate will notify the table view controller when any changes have occurred to the underlying data structure. Typically, the table view controller will also be the delegate to the fetched results controller so that it can receive callbacks whenever there are changes to the underlying data.
Next, you start the NSFetchedResultsController by a call to performFetch:. This call retrieves the initial data to be displayed and causes the NSFetchedResultsController instance to start monitoring the managed object context for changes.
######Integrating the Fetched Results Controller with the Table View Data Source
After you integrate the initialized fetched results controller and have data ready to be displayed in the table view, you need to integrate the fetched results controller with the table view data source
######Communicating Data Changes to the Table View
In addition to making it significantly easier to integrate Core Data with the table view data source, NSFetchedResultsController handles the communication with the UITableViewController instance when data changes. To enable this, implement the NSFetchedResultsControllerDelegate protocol:
#pragma mark - NSFetchedResultsControllerDelegate
- (void)controllerWillChangeContent:(NSFetchedResultsController *)controller
{
    [[self tableView] beginUpdates];
}
- (void)controller:(NSFetchedResultsController *)controller didChangeSection:(id <NSFetchedResultsSectionInfo>)sectionInfo atIndex:(NSUInteger)sectionIndex forChangeType:(NSFetchedResultsChangeType)type
{
    switch(type) {
        case NSFetchedResultsChangeInsert:
            [[self tableView] insertSections:[NSIndexSet indexSetWithIndex:sectionIndex] withRowAnimation:UITableViewRowAnimationFade];
            break;
        case NSFetchedResultsChangeDelete:
            [[self tableView] deleteSections:[NSIndexSet indexSetWithIndex:sectionIndex] withRowAnimation:UITableViewRowAnimationFade];
            break;
        case NSFetchedResultsChangeMove:
        case NSFetchedResultsChangeUpdate:
            break;
    }
}
- (void)controller:(NSFetchedResultsController *)controller didChangeObject:(id)anObject atIndexPath:(NSIndexPath *)indexPath forChangeType:(NSFetchedResultsChangeType)type newIndexPath:(NSIndexPath *)newIndexPath
{
    switch(type) {
        case NSFetchedResultsChangeInsert:
            [[self tableView] insertRowsAtIndexPaths:@[newIndexPath] withRowAnimation:UITableViewRowAnimationFade];
            break;
        case NSFetchedResultsChangeDelete:
            [[self tableView] deleteRowsAtIndexPaths:@[indexPath] withRowAnimation:UITableViewRowAnimationFade];
            break;
        case NSFetchedResultsChangeUpdate:
            [self configureCell:[[self tableView] cellForRowAtIndexPath:indexPath] atIndexPath:indexPath];
            break;
        case NSFetchedResultsChangeMove:
            [[self tableView] deleteRowsAtIndexPaths:@[indexPath] withRowAnimation:UITableViewRowAnimationFade];
            [[self tableView] insertRowsAtIndexPaths:@[newIndexPath] withRowAnimation:UITableViewRowAnimationFade];
            break;
    }
}
- (void)controllerDidChangeContent:(NSFetchedResultsController *)controller
{
    [[self tableView] endUpdates];
}
As shown in each UITableViewDataSource method above, the integration with the fetched results controller is reduced to a single method call that is specifically designed to integrate with the table view data source.
Adding Caching for Performance
In many situations, a table view will represent a relatively static type of data. A fetch request is defined at the creation of the table view controller, and it never changes throughout the life of the application. In those situations it can be advantageous to add a cache to the NSFetchedResultsController instance so that when the application is launched again and the data has not changed, the table view will initialize instantaneously. A cache is especially useful for displaying unusually large data sets.
[self setFetchedResultsController:[[NSFetchedResultsController alloc] initWithFetchRequest:request managedObjectContext:moc sectionNameKeyPath:@"department.name" cacheName:@"rootCache"]];
As shown above, the cacheName property is set when the NSFetchedResultsController instance is initialized, and the fetched results controller automatically gains a cache. Subsequent loading of the data will be nearly instantaneous.
Managed Objects and References
References determine when managed objects are released from memory and also affect what causes them to be retained.
Weak References Between Managed Objects and the Context
Managed objects know what managed object context they’re associated with, and managed object contexts know what managed objects they contain. By default, though, the references between a managed object and its context are weak.
The exception to this rule is that a managed object context maintains a strong reference to any changed (inserted, deleted, and updated) objects until the pending transaction is committed (with a save:) or discarded (with a reset or rollback).
Creating a Strong Reference Between Managed Objects and the Context
You can change a context’s default behavior so that it does keep strong references to its managed objects by sending the managed object context a retainsRegisteredObjects message (with the argument YES).
For example, suppose the context controls a temporary set of objects that may persist beyond a single event cycle, such as a sheet in an OS X application or a modal view in an iOS application. Making managed objects dependent on the context can also be useful if you are using multiple threads and passing data between them — for example, if you are performing a background fetch and passing object IDs to the main thread. The background thread needs to keep strong references to the objects it prefetched for the main thread until it knows the main thread has actually used the object IDs to fault local instances into the main thread. Otherwise the objects may fall out of memory and need to be retrieved again from disk.
simply relinquish ownership of the context and allow it to be deallocated normally.
[self setMyManagedObjectContext:nil];
Breaking Strong References Between Objects
As opposed to the default behavior between managed objects and their managed object contexts, with relationships between managed objects, each object maintains a strong reference to the object or objects to which it is related. This relationship can cause strong reference cycles which in turn can cause objects to be held in memory long past their usefulness. To ensure that reference cycles are broken, when you are finished with an object, you can use the managed object context method refreshObject:mergeChanges: to turn the managed object into a fault.
You typically use refreshObject:mergeChanges: to refresh a managed object’s property values. If the mergeChanges flag is YES, the method merges the object’s property values with those of the object available in the persistent store coordinator. If the flag is NO, however, the method simply turns an object back into a fault without merging, which causes it to break strong references to related managed objects.
Strong References in Change and Undo Management
A context keeps strong references to managed objects that have pending changes (insertions, deletions, or updates) until the context is sent a save:, reset , rollback, or dealloc message, or the context is sent the appropriate number of undos to undo the change. If the calls to undo cause all changes to be undone on a particular object, the object’s strong reference will revert back to a weak reference.
Ensuring Data Is Up to Date
If two applications are using the same data store, or a single application has multiple persistence stacks, it is possible for managed objects in one managed object context or persistent object store to get out of sync with the contents of the repository.
To refresh a managed object’s property values, you use the managed object context method refreshObject:mergeChanges:. If the mergeChanges flag is YES, the method merges the object’s property values with those of the object available in the persistent store coordinator. If the flag is set to NO, the method simply turns an object back into a fault without merging, which also causes strong references to other related managed objects to be broken.
Faulting and Uniquing
Faulting reduces your application’s memory usage by keeping placeholder objects (faults) in the persistent store. A related feature called uniquing ensures that, in a given managed object context, you never have more than one managed object to represent a given record.
关于这部分内容。。。还没有理解透。。。O__O …
https://developer.apple.com/library/tvos/documentation/Cocoa/Conceptual/CoreData/FaultingandUniquing.html#//apple_ref/doc/uid/TP40001075-CH18-SW1
Change Management
If your application contains more than one managed object context and you allow objects to be modified in more than one context, you need to be able to reconcile the changes. This is a fairly common situation when an application is importing data from a network and the user can also edit that data.
Multiple Contexts in One Application
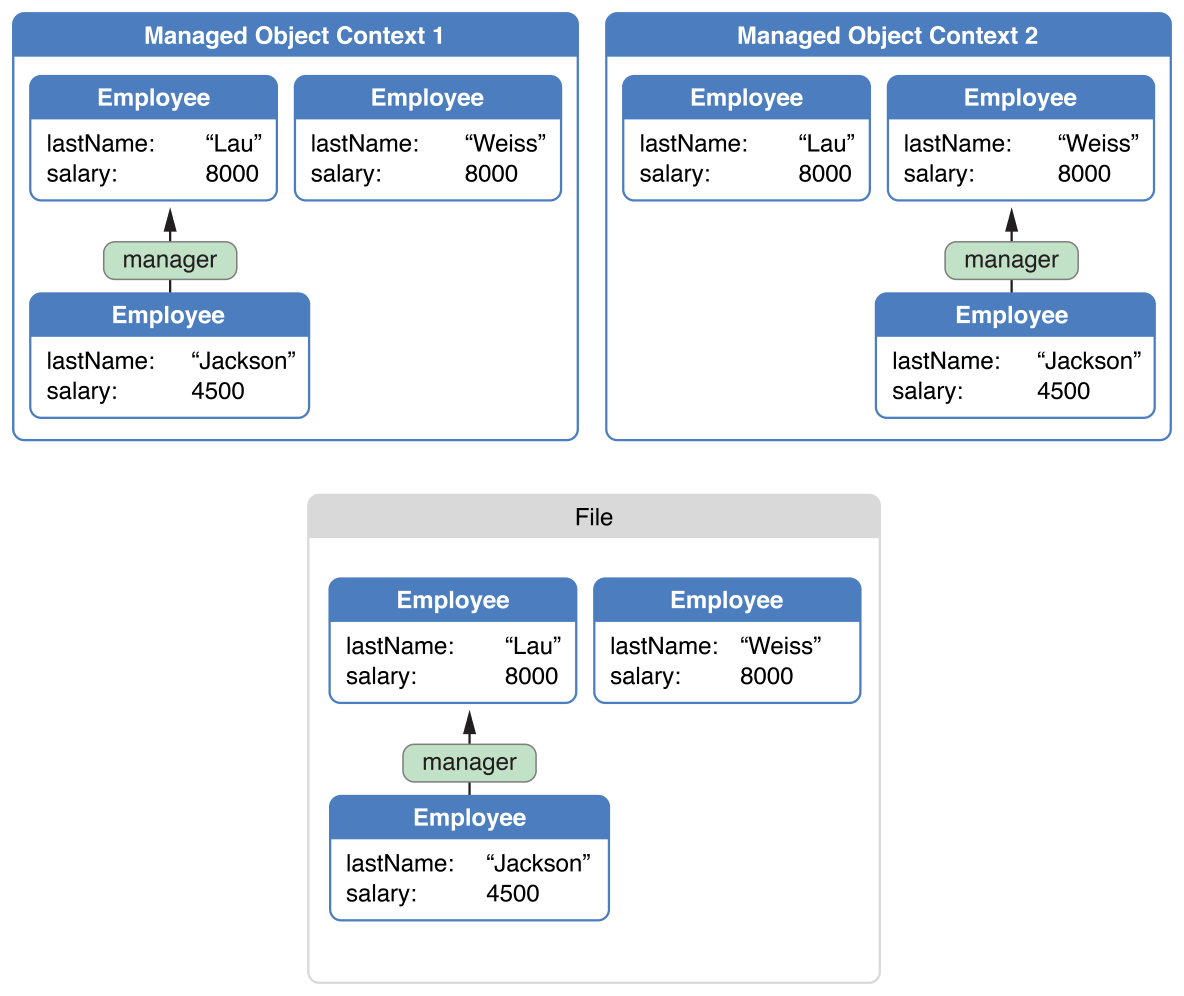
In an employee application, for example, you might have two separate windows that display the same set of employees, but distributed between different departments and with different managers, as shown in Figure 15-1. Note how the manager relationship has moved from Lau to Weiss. Managed object context 1 still represents what is on disk, but managed object context 2 has changed.
Figure 15-1 Managed object contexts with mutually inconsistent data values
Conflict Detection and Optimistic Locking
When Core Data fetches an object from a persistent store, it takes a snapshot of its state. A snapshot is a dictionary of an object’s persistent properties—typically all its attributes and the global IDs of any objects to which it has a to-one relationship.Snapshots participate in optimistic locking. When the framework saves, it compares the values in each edited object’s snapshot with the then-current corresponding values in the persistent store.
- If the values are the same, then the store has not been changed since the object was fetched, so the save proceeds normally. As part of the save operation, the snapshots’ values are updated to match the saved data.
- If the values differ, then the store has been changed since the object was fetched or last saved; this represents an optimistic locking failure. The conflict must be resolved.
Choosing a Merge Policy
You can get an optimistic locking failure if more than one Core Data stack references the same external data store regardless of whether you have multiple Core Data stacks in a single application or you have multiple applications.
Choose a merge policy for the managed object context that is suitable for your situation.
The default behavior is defined by an NSErrorMergePolicy property. This policy causes a save to fail if there are any merge conflicts.
Alternatively, you specify a different policy. The NSErrorMergePolicy is the only policy that generates an error. Other policies — NSMergeByPropertyStoreTrumpMergePolicy, NSMergeByPropertyObjectTrumpMergePolicy, and NSOverwriteMergePolicy — allow the save to proceed by merging the state of the edited objects with the state of the objects in the store in different ways. The NSRollbackMergePolicy discards in-memory state changes for objects in conflict and uses the persistent store’s version of the objects’ state.
Automatic Snapshot Management
An application that fetches hundreds of rows of data can build up a large cache of snapshots. Theoretically, if enough fetches are performed, a Core Data-based application can contain all the contents of a store in memory. Clearly, snapshots must be managed in order to prevent this situation.
Responsibility for cleaning up snapshots rests with a mechanism called snapshot reference counting. This mechanism keeps track of the managed objects that are associated with a particular snapshot—that is, managed objects that contain data from a particular snapshot. When there are no remaining managed object instances associated with a particular snapshot (which Core Data determines by maintaining a list of strong references), Core Data automatically breaks the reference to the snapshot and it is removed from memory.
Synchronizing Changes Between Contexts
If you use more than one managed object context in an application, Core Data does not automatically notify one context of changes made to objects in another. In general, this is because a context is intended to be a scratch pad where you can make changes to objects in isolation, and you can discard the changes without affecting other contexts. If you do need to synchronize changes between contexts, how a change should be handled depends on the user-visible semantics you want in the second context, and on the state of the objects in the second context.
-
Registering with NSNotificationCenter
Consider an application with two managed object contexts and a single persistent store coordinator. If a user deletes an object in the first context (moc1), you may need to inform the second context (moc2) that an object has been deleted. In all cases, moc1 automatically posts anNSManagedObjectContextDidSaveNotificationnotification via theNSNotificationCenterthat your application should register for and use as the trigger for whatever actions it needs to take. This notification contains information not only about deleted objects, but also about changed objects. You need to handle these changes because they may be the result of the delete. Most of these types of changes involve transient relationships or fetched properties. -
Choosing a Synchronization Strategy
When deciding how you want to handle your delete notification, consider:- What other changes exist in the second context?
- Does the instance of the object that was deleted have changes in the second context?
- Can the changes made in the second context be undone?
These concerns are somewhat orthogonal, and what actions you take to synchronize the contexts depend on the semantics of your application. The following three strategies are presented in order of increasing complexity.
- The object itself has been deleted in moc1 but has not changed in moc2. In that situation you do not have to worry about undo, and you can just delete the object in moc2. The next time moc2 saves, the framework will notice that you are trying to redelete an object, ignore the optimistic locking warning, and continue without error.
- If you do not care about the contents of moc2, you can simply reset it (using reset) and refetch any data you need after the reset. This will reset the undo stack as well, and the deleted object is now gone. The only issue here is determining what data to refetch. Do this before you reset by collecting the IDs (objectID) of the managed objects you still need and using those to reload once the reset has happened. You must exclude the deleted IDs, and it is best to create fetch requests with IN predicates to ensure faults will be fulfilled for deleted IDs.
-
If the object has changed in moc2, but you do not care about undo, your strategy depends on what it means for the semantics of your application. If the object that was deleted in moc1 has changes in moc2, should it be deleted from moc2 as well? Or should it be resurrected and the changes saved? What happens if the original deletion triggered a cascade delete for objects that have not been faulted into moc2? What if the object was deleted as part of a cascade delete?
There are two workable options:
- Simply discard the changes by deleting the object in the moc that is receiving the notification.
- Alternatively, if the object is standalone, set the merge policy on the context to NSOverwriteMergePolicy. This policy will cause the changes in the second context to overwrite the delete in the database.it will cause all changes in moc2 to overwrite any changes made in moc1.
Persistent Store Types and Behaviors
Core Data provides an in-memory persistent store and three disk-based persistent stores, as described in Table 16-1. The binary store (NSBinaryStoreType) is an atomic store, as is the XML store (NSXMLStoreType).
NOTE
The XML store is not available in iOS.
Table 16-1 Built-in persistent store types

IMPORTANT
Although Core Data supports SQLite as a store type, the store format—like those of the other native Core Data stores—is private. You cannot create a SQLite database using the native SQLite API and use it directly with Core Data, nor should you manipulate an existing Core Data SQLite store using native SQLite API. If you have an existing SQLite database, you need to import it into a Core Data store.
Limitations of Persistent Store Security
Core Data makes no guarantees regarding the security of persistent stores from untrusted sources (as opposed to stores generated internally) and cannot detect whether files have been maliciously modified. The SQLite store offers slightly better security than the XML and binary stores, but it should not be considered inherently secure. Note also that it is possible for data archived in the metadata to be tampered with independently of the store data. To ensure data security, use a technology such as an encrypted disk image.
Fetch Predicates and Sort Descriptors
Fetching differs somewhat according to the type of store. In the XML, binary, and in-memory stores, evaluation of the predicate and sort descriptors is performed in Objective-C with access to all Cocoa functionality, including the comparison methods on NSString.
The SQLite store, on the other hand, compiles the predicate and sort descriptors to SQL and evaluates the result in the database itself. This is done primarily for performance, but it means that evaluation happens in a non-Cocoa environment, and so sort descriptors (or predicates) that rely on Cocoa cannot work.
SQLite File Size and Record Deletion
Simply deleting a record from a SQLite store does not necessarily result in a reduction in the size of the file. If enough items are removed to free up a page in the database file, SQLite’s automatic database vacuuming will reduce the size of the file as it rearranges the data to remove that page.
An SQLite file is organized as a collection of pages. The data within those pages is managed through B-trees, not as simple fixed-length records. This format is more efficient for searching and for overall storage, because it allows SQLite to optimize how it stores both data and indexes in a single file. This format is also the foundation of SQLite’s data integrity (transaction and journaling) mechanism. However, the cost of this design is that some delete operations may leave holes in the file and impact read and write performance. If you delete some data and add other data, the holes left by the deleted data may be filled by the added data, or the file may be vacuumed to compact its data, whichever SQLite considers most appropriate based on the operations you’re performing.
Configuring Save Behavior for a SQLite Store
When Core Data saves a SQLite store, SQLite updates just part of the store file. Loss of that partial update would be catastrophic, so ensure that the file is written correctly before your application continues. Unfortunately, doing partial file updates means that in some situations saving even a small set of changes to a SQLite store can take considerably longer than saving to, say, an XML store.
IMPORTANT
In OS X the fsync command does not guarantee that bytes are written, so SQLite sends a F_FULLFSYNC request to the kernel to ensure that the bytes are actually written through to the drive platter. This request causes the kernel to flush all buffers to the drives and causes the drives to flush their track caches. Without this, there is a significantly large window of time within which data will reside in volatile memory. If system failure occurs you risk data corruption.
Changing a Store’s Type and Location
You can migrate a store from one type or location to another (for example, for a Save As operation) using the NSPersistentStoreCoordinator method migratePersistentStore:toURL:options:withType:error:.
NSPersistentStoreCoordinator *psc = [[self managedObjectContext] persistentStoreCoordinator];
NSURL *oldURL = <#URL identifying the location of the current store#>;
NSURL *newURL = <#URL identifying the location of the new store#>;
NSError *error = nil;
NSPersistentStore *xmlStore = [psc persistentStoreForURL:oldURL];
NSPersistentStore *sqLiteStore = [psc migratePersistentStore:xmlStore
    toURL:newURL
    options:nil
    withType:NSSQLiteStoreType
    error:&error];
To migrate a store, Core Data:
- Creates a temporary persistence stack.
- Mounts the old and new stores.
- Loads all objects from the old store.
- Migrates the objects to the new store.
- Informs other stacks that the object IDs have changed (from the old to the new stores), which keeps the stack running after a migration.
- Unmounts the old store.
- Returns the new store.
Associating Metadata with a Store
A store’s metadata provides additional information about the store that is not directly associated with any of the entities in the store.
The metadata is represented by a dictionary. Core Data automatically sets key-value pairs to indicate the store type and its UUID. You can create additional custom keys for your application, or provide a standard set of keys such as kMDItemKeywords to support Spotlight indexing (if you also write a suitable importer).
- Getting the Metadata
There are two ways to get the metadata for a store:- Given an instance of a persistent store, get its metadata using the NSPersistentStoreCoordinator instance method metadataForPersistentStore:.
- Retrieve metadata from a store without the overhead of creating a persistence stack by using the NSPersistentStoreCoordinator class method, metadataForPersistentStoreOfType:URL:error:.
There is an important difference between these approaches. The instance method,
metadataForPersistentStore:, returns the metadata as it currently is in your program, including any changes that may have been made since the store was last saved. The class method,metadataForPersistentStoreOfType:URL:error:, returns the metadata as it is currently represented in the store itself. If there are pending changes to the store, the returned value may therefore be out of sync. - Setting the Metadata
There are two ways you can set the metadata for a store:- Given an instance of a persistent store, set its metadata using the
NSPersistentStoreCoordinatorinstance method,setMetadata:forPersistentStore:. - Set the metadata without the overhead of creating a persistence stack by using the
NSPersistentStoreCoordinatorclass method,setMetadata:forPersistentStoreOfType:URL:error:.
There is again an important difference between these approaches. If you use
setMetadata:forPersistentStore:, you must save the store (through a managed object context) before the new metadata is saved. If you usesetMetadata:forPersistentStoreOfType:URL:error:, however, the metadata is updated immediately, and the last-modified date of the file is changed.NSURL *url = [NSURL fileURLWithPath:@"url to store"]; NSPersistentStore *store = [self.managedObjectContext.persistentStoreCoordinator persistentStoreForURL:url]; NSMutableDictionary *metadata = [[store metadata] mutableCopy]; metadata[@"MyKeyWord"] = @"MyStoredValue"; [store setMetadata:metadata]; - Given an instance of a persistent store, set its metadata using the
Concurrency
Concurrency is the ability to work with the data on more than one queue at the same time. If you choose to use concurrency with Core Data, you also need to consider the application environment. For the most part, AppKit and UIKit are not thread-safe.
Core Data, Multithreading, and the Main Thread
In Core Data, the managed object context can be used with two concurrency patterns, defined by NSMainQueueConcurrencyType and NSPrivateQueueConcurrencyType.
NSMainQueueConcurrencyType is specifically for use with your application interface and can only be used on the main queue of an application.
The NSPrivateQueueConcurrencyType configuration creates its own queue upon initialization and can be used only on that queue. Because the queue is private and internal to the NSManagedObjectContext instance, it can only be accessed through the performBlock: and the performBlockAndWait: methods.
NSManagedObjectContext *moc = [[NSManagedObjectContext alloc] initWithConcurrencyType:<#type#>];
Using a Private Queue to Support Concurrency
In general, avoid doing data processing on the main queue that is not user-related. Data processing can be CPU-intensive, and if it is performed on the main queue, it can result in unresponsiveness in the user interface. If your application will be processing data, such as importing data into Core Data from JSON, create a private queue context and perform the import on the private context.
NSArray *jsonArray = …; //JSON data to be imported into Core Data
NSManagedObjectContext *moc = …; //Our primary context on the main queue

NSManagedObjectContext *private = [[NSManagedObjectContext alloc] initWithConcurrencyType:NSPrivateQueueConcurrencyType];
[private setParentContext:moc];

[private performBlock:^{
    for (NSDictionary *jsonObject in jsonArray) {
        NSManagedObject *mo = …; //Managed object that matches the incoming JSON structure
        //update MO with data from the dictionary
    }
    NSError *error = nil;
    if (![private save:&error]) {
        NSLog(@"Error saving context: %@\n%@", [error localizedDescription], [error userInfo]);
        abort();
    }
}];
Passing References Between Queues
NSManagedObject instances are not intended to be passed between queues. Doing so can result in corruption of the data and termination of the application. When it is necessary to hand off a managed object reference from one queue to another, it must be done through NSManagedObjectID instances.
You retrieve the managed object ID of a managed object by calling the objectID method on the NSManagedObject instance.
###Performance
Overhead versus Functionality in Core Data
NSManaged Object Storage Mechanism
NSManagedObject uses an internal storage mechanism for data that is highly optimized. In particular, it leverages the information about the types of data that is available through introspecting the model. When you store and retrieve data in a manner that is compliant with key-value coding and key-value observing, it is likely that using NSManagedObject will be faster than any other storage mechanism — including for the simple get/set cases.
Fetching Managed Objects
Each round trip to the persistent store (each fetch) incurs an overhead, both in accessing the store and in merging the returned objects into the persistence stack. Avoid executing multiple requests if you can instead combine them into a single request that will return all the objects you require. You can also minimize the number of objects you have in memory.
-
Fetch Predicates
How you use predicates can significantly affect the performance of your application. If a fetch request requires a compound predicate, you can make the fetch more efficient by ensuring that the most restrictive predicate is the first, especially if the predicate involves text matching (contains, endsWith, like, and matches).Correct Unicode searching is slow. If the predicate combines textual and nontextual comparisons, then it is likely to be more efficient to specify the nontextual predicates first, for example, (salary > 5000000) AND (lastName LIKE ‘Quincey’) is better than (lastName LIKE ‘Quincey’) AND (salary > 5000000).
-
Fetch Limits
You can set a limit to the number of objects a fetch will return using the method setFetchLimit:, as shown in the following example:NSFetchRequest *request = [[NSFetchRequest alloc] init]; [request setFetchLimit:100];If you are using the SQLite store, you can use a fetch limit to minimize the working set of managed objects in memory, and so improve the performance of your application. If you need to retrieve many objects, you can make your application appear more responsive by executing multiple fetches. In the first fetch, you retrieve a comparatively small number of objects—for example, 100—and populate the user interface with these objects. You then execute subsequent fetches to retrieve the complete result set via the fetchOffset method.
Preventing a Fault from Firing
Firing faults can be a relatively expensive process (potentially requiring a round trip to the persistent store), and you may wish to avoid unnecessarily firing a fault. You can safely invoke the following methods on a fault without causing it to fire: isEqual:, hash, superclass, class, self, zone, isProxy, isKindOfClass:, isMemberOfClass:, conformsToProtocol:, respondsToSelector:, description, managedObjectContext, entity, objectID, inserted, updated, deleted, and isFault.
Decreasing Fault Overhead
When you execute a fetch, Core Data fetches only instances of the entity you specify. In some situations (see Faulting Limits the Size of the Object Graph), the destination of a relationship is represented by a fault.
For example, consider this model:

You might fetch a number of Employees and ask each in turn for their Department’s name, as shown in the following code fragment.
NSFetchRequest * employeesFetch = [NSFetchRequest fetchRequestWithEntityName:@"Employee"];
// The request should include a predicate -- if you don't have a predicate here,
// you should probably just fetch all the Departments.
NSArray *fetchedEmployees = [moc executeFetchRequest:employeesFetch error:&error];
if (fetchedEmployees == nil) {
    NSLog(@"Error fetching: %@\n%@", [error localizedDescription], [error userInfo]);
    abort();
}
for (Employee *employee in fetchedEmployees) {
    NSLog(@"%@ -> %@ department", employee.name, employee.department.name);
}
There are two techniques you can use to mitigate this effect—batch faulting and prefetching.
- Batch Faulting
You can batch fault a collection of objects by executing a fetch request using a predicate with an IN operator, as illustrated by the following example.
NSArray *array = @[fault1, fault2, ...];
NSPredicate *predicate = [NSPredicate predicateWithFormat:@"self IN %@", array];
- Prefetching
Prefetching is in effect a special case of batch-faulting, performed immediately after another fetch. The idea behind prefetching is the anticipation of future needs.
You can use the NSFetchRequest method setRelationshipKeyPathsForPrefetching: to specify an array of relationship key paths to prefetch along with the entity for the request.
For example, given an Employee entity with a relationship to a Department entity: If you fetch all the employees, for each employee, print out the employee’s name and the name of the department. You can avoid the possibility of a fault being fired for each department instance by prefetching the department relationship. This is illustrated in the following code fragment:
NSManagedObjectContext *moc = …;
NSFetchRequest *request = [NSFetchRequest fetchRequestWithEntityName:@"Employee"];
[request setRelationshipKeyPathsForPrefetching:@[@"department"]];
Reducing Memory Overhead
Sometimes you need to use managed objects on a temporary basis, for example, to calculate an average value for a particular attribute. Loading a large number of objects into memory causes your object graph, and memory consumption, to grow. You can reduce the memory overhead by refaulting individual managed objects that you no longer need, or you can reset a managed object context to clear an entire object graph. You can also use patterns that apply to Cocoa programming in general.
Follow these guidelines to reduce memory overhead:
- Refault an individual managed object using the refreshObject:mergeChanges: method for NSManagedObjectContext. Doing so clears the object’s in-memory property values thereby reducing its memory overhead. (Note that the values will be retrieved on demand if the fault is again fired — see Faulting and Uniquing.)
- When you create a fetch request, set includesPropertyValues to NO to reduce memory overhead by avoiding creation of objects to represent the property values. You should typically only do so, however, if you are sure that either you will not need the actual property data or you already have the information in the row cache. Otherwise you will incur multiple trips to the persistent store.
- Use the reset method of NSManagedObjectContext to remove all managed objects associated with a context, and start over as if you’d just created it. Note that managed objects associated with that context will be invalidated, and so you will need to discard any references to and refetch any objects associated with that context.
- If you iterate over a lot of objects, you may need to use local autorelease pool blocks to ensure temporary objects are deallocated as soon as possible.
- If you do not intend to use Core Data’s undo functionality, reduce your application’s resource requirements by setting the context’s undo manager to nil. This may be especially beneficial for background worker threads, as well as for large import or batch operations.
- If you have lots of objects in memory, determine the owning references. Core Data does not by default keep strong references to managed objects (unless they have unsaved changes). Managed objects maintain strong references to each other through relationships, which can easily create strong reference cycles. You can break cycles by refaulting objects (again by using the refreshObject:mergeChanges: method of NSManagedObjectContext).
Analyzing Fetch Behavior with SQLite
You can use the user default com.apple.CoreData.SQLDebug to log to stderr the actual SQL sent to SQLite. (Note that user default names are case-sensitive.)
Analyzing Application Behavior with Instruments
There are several Instruments probes specific to Core Data:
- Core Data Fetches. Records invocations of
executeFetchRequest:error:, providing information about the entity against which the request was made, the number of objects returned, and the time taken for the fetch. - Core Data Saves. Records invocations of save: and the time taken to do the save.
- Core Data Faults. Records information about object and relationship fault firing. For object faults, Instruments records the object being faulted; for relationship faults, it records the source object and the relationship being fired. In both cases, it records the time taken to fire the fault.
- Core Data Cache Misses. Traces fault behavior that specifically results in file system activity — the instrument indicates that a fault was fired for which no data was available — and records the time taken to retrieve the data.
Troubleshooting and FAQs
Troubleshooting Core Data
Frequently Asked Questions
写在最后
参考文章
https://developer.apple.com/library/tvos/documentation/Cocoa/Conceptual/CoreData/index.html
http://objccn.io/issue-4/
http://www.appcoda.com/introduction-to-core-data/